
HDMI Signal Tester: How to Test, Diagnose, and Choose the Right Tool
A cable can pass a basic test and still leave you with a blank screen. An HDMI signal tester can help narrow the fault, but only if its test matches the problem: continuity checks, format verification, and EDID or HDCP troubleshooting answer different questions. Passing one test doesn’t prove that every device in the signal path is compatible.
If you’re dealing with intermittent video or a “no signal” message, it’s easy to suspect the cable first. The source, display, switcher, and their handshakes can also affect the connection. This guide explains what different HDMI signal tester types can measure, how to test the signal path systematically, and which capabilities to prioritize for your supported formats and AV setup.
You’ll learn how basic cable testers differ from handheld field analyzers and compliance tools, then follow a practical sequence for isolating faults. We’ll also cover how to interpret results, where EDID and HDCP issues fit into diagnosis, and why a successful test doesn’t automatically establish end-to-end compatibility.
Key Takeaways
- Choose an HDMI signal tester based on the fault you need to isolate, from cable continuity to signal and format checks.
- Start troubleshooting with a direct connection and known-good components, then change one variable at a time.
- Compare the tester’s documented limits with the resolution and refresh rate your AV setup requires.
- Use test results to guide the next diagnostic step, not as automatic proof that a cable or device needs replacing.
- Identify where a matrix switcher, extender, or video wall processor fits in the signal path before selecting system hardware.
What an HDMI Signal Tester Can, and Cannot, Tell You
An HDMI signal tester evaluates selected properties of a cable, signal, or connection. Its result applies to the test it performs, not automatically to every device or format in the system. For example, a continuity check assesses wiring but doesn’t confirm that a source, switcher, extender, and display will work together at the required format.
That distinction matters because HDMI involves more than physical connectivity. The HDMI standard includes specifications and features that vary by version, while individual testers support different checks. Before treating a status as a system-wide compatibility verdict, compare the tester’s documented functions and limits with the problem you’re investigating.
What does an HDMI signal tester measure?
Basic cable testers check continuity or wiring. They can help identify an open conductor, short, or wiring fault, but that’s a cable-level result. It doesn’t necessarily verify how the cable performs with an active signal or a particular resolution and refresh rate.
More advanced tools may detect whether a signal is present or report information about its format. Source and display emulators take a different approach: they mimic one side of a connection, helping isolate how a source or display responds under controlled conditions. Other tools may provide diagnostics for connection or handshake behavior. Check the specific test modes and supported limits rather than assuming every analyzer provides the same information.
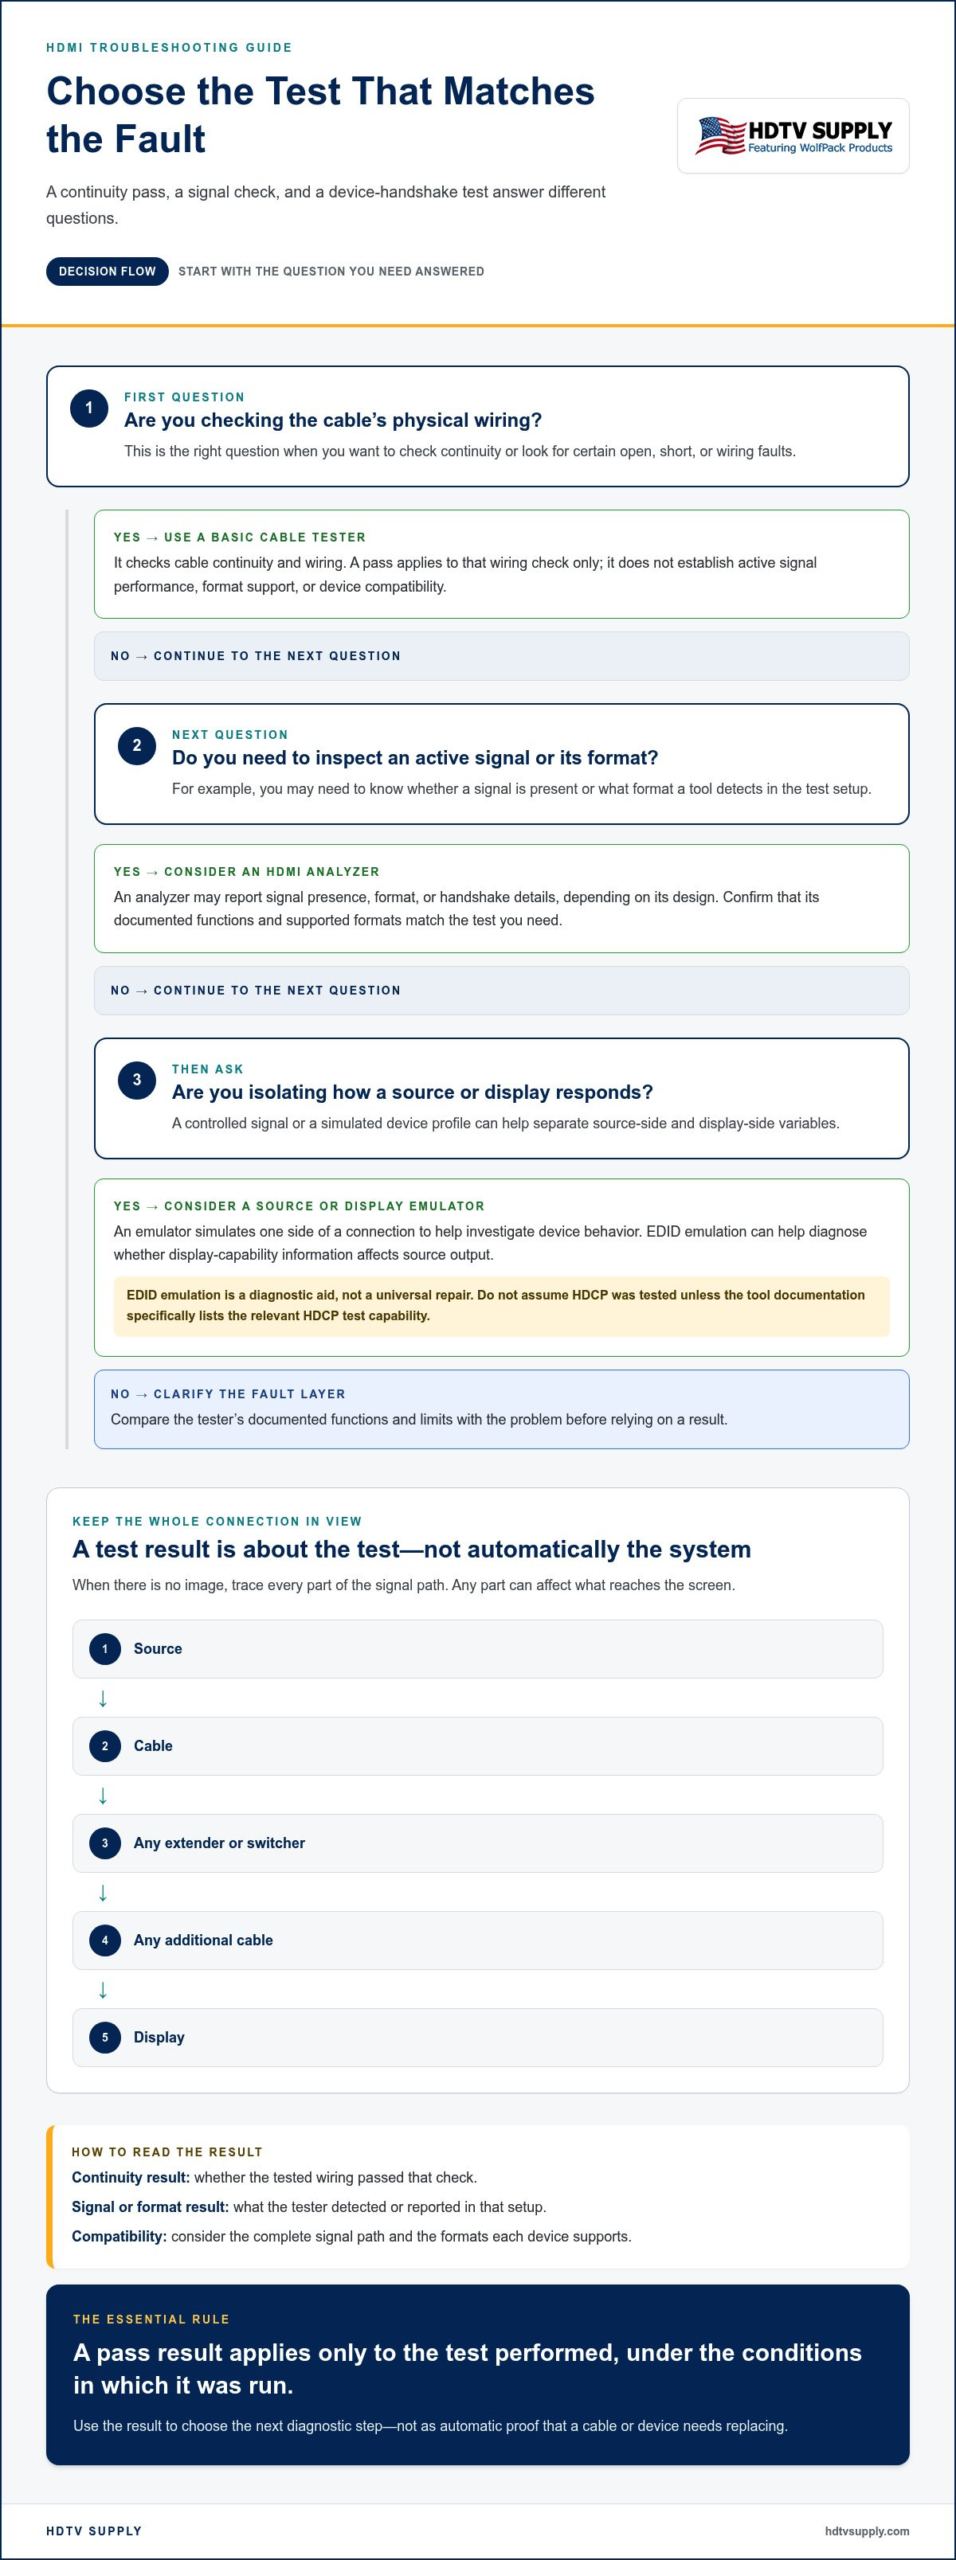
A pass result applies only to the test performed, under the conditions in which it was run. A cable continuity pass doesn’t establish signal performance, format support, or end-to-end compatibility.
Why a basic cable check may not solve a no-signal fault
A cable can pass a basic wiring check while the connected system still shows no image. The tester may have confirmed that conductors connect, but not that the full chain can establish and maintain the required signal. A format mismatch or failed device handshake may be outside the scope of a simple cable test.
Trace the connection as a system: source, cable, any extender or switcher, any additional cable, and display. Each part can affect what reaches the screen, so don’t assign blame based on a single result. A direct cable test narrows the question to wiring. Testing the active signal or substituting an emulator can help investigate other parts of the connection.
- Continuity result: Indicates whether the tested wiring path passed that check.
- Signal or format result: Indicates what the tester detected or reported in that test setup.
- Compatibility: Requires considering the complete signal path and the formats each device supports.
HDMI Signal Tester Types: Match the Tool to the Test
Choose a tester based on the layer you need to examine. A cable tester, signal analyzer, and emulator answer different questions. Compare their documented functions and supported formats with the fault you’re trying to isolate before relying on a result.
| Tool type | Test target | Useful result | Limitation |
|---|---|---|---|
| Basic cable tester | Cable continuity and wiring | Identifies certain open, short, or wiring faults | Doesn’t establish active signal performance or device compatibility |
| HDMI analyzer | Active signal and, depending on the tool, format or handshake information | Shows what the analyzer detects in the test setup | Results depend on the tester’s supported formats and functions |
| Source or display emulator | Device interaction, such as source output or display response | Helps isolate behavior by simulating one side of a connection | Doesn’t prove that every device in the installed chain will work together |
Cable tester vs. HDMI analyzer
A cable tester checks the physical wiring path. An HDMI analyzer examines an active connection and may report signal presence, format, or other diagnostic details, depending on its design. Neither category identifies every possible fault.
For example, a cable may pass continuity testing, yet the display may still show no image when connected to the source. That result tells you the basic wiring check passed, but the active signal path still needs investigation. An analyzer may provide more relevant information if it supports the format and conditions being tested.
When signal generators and emulators are useful
A known test source can help determine whether a display responds to a controlled signal. A source emulator can help assess how connected equipment behaves with a simulated display profile. These tests help isolate source-side and display-side variables without assuming either device is at fault.
EDID emulation can help diagnose whether display capability information is affecting source output. It’s a diagnostic aid, not a universal repair. Changing EDID behavior may change the result without resolving another issue in the chain. Likewise, don’t assume HDCP has been tested unless the tool documentation specifically lists the relevant HDCP test capability.
Select a tester by the fault layer, not its feature count. Match its test modes and supported formats to the question you need answered. For professional signal routing and display distribution, explore professional AV system hardware suited to the signal path.
How to Test an HDMI Signal Chain Without Guesswork
A repeatable test isolates a failure more effectively than swapping several components at once. Start with the simplest connection, keep conditions consistent, and add equipment back into the path one piece at a time. An HDMI signal tester can help at the relevant step, but recording what changed is just as valuable.
Start with the source, cable, and display
Establish a baseline before testing intermediary devices. Confirm that the source is set to an output the display supports, then select the correct display input. Connect the source directly to the display with a known-good cable.
- Record the original symptom. Note whether there’s no image, intermittent video, or a problem limited to a particular format.
- Test the direct connection. Use the same source, display, and cable for each baseline attempt. Record whether the image appears and, if available, the format reported by the display.
- Change one variable. If the baseline fails, test a known-good cable or another compatible source or display, changing only one item at a time. Record each result.
- Repeat the same conditions. Comparisons are useful only when the source settings, display input, and test format remain consistent.
This baseline shows whether the problem occurs in the simplest connection or only after additional equipment is introduced. It also helps prevent an intermittent fault from being mistaken for a fix after a single successful test.
Isolate extenders, switchers, and EDID behavior
Once the direct connection works, reintroduce the installation in stages. Add one intermediary, such as an extender, adapter, or switcher, and repeat the same test. If video fails, bypass that device and compare. Where possible, test separate cable segments while keeping the source, display, and format unchanged.
- Add one device at a time. Record the device, input and output connections, source settings, and displayed format.
- Compare with a bypass. If the failure disappears when a matrix or extender is bypassed, investigate that section and its connections. This narrows the fault location but doesn’t prove the device alone is responsible.
- Check EDID when behavior changes with routing. If the source output or display result differs by matrix input or route, review the system’s EDID management. The HDMI matrix EDID management guide provides additional system context.
- Reconnect the full path. After testing segments, restore the complete signal chain and verify the original operating conditions.
For a closer look at matrix configuration and signal routing, see the modular HDMI matrix switcher guide. Make each test a useful comparison: keep conditions the same, change one element, and record the result.
How to Read HDMI Tester Results and Choose the Right Capabilities
A tester’s readout is evidence about a specific check, not a universal verdict on the installation. Interpret each result in light of the tool’s test mode, documented limits, and the conditions used. A tester can validate only the capabilities it explicitly measures.
A “pass” means the selected test met that tester’s criteria. A “fail” means the selected check did not meet those criteria, but it doesn’t automatically identify the faulty component. “No signal” means the tester didn’t detect a signal at its test point under the current setup. An “unsupported format” message may mean the device under test doesn’t support the format, or that the tester itself can’t test it. Review the manual and test setup before drawing a conclusion.
Which tester features matter for a professional AV system?
Start with the installation requirements, then compare them with the tester’s documentation. Check its inputs and outputs, supported formats, and stated test functions. Match the listed resolution and refresh rate to the operating mode you need to verify. A tester that detects signal presence may not analyze format, and a format readout doesn’t necessarily evaluate image quality or content-protection behavior.
Consider where testing happens. A portable tool may suit field checks across installed runs, while controlled bench diagnostics may call for specific source, display, or analysis functions. Don’t assume capabilities from labels such as “analyzer” or “professional.” Confirm the exact model’s documented limits, including whether HDCP testing is explicitly supported.
What a pass result does not guarantee
A cable-level pass doesn’t validate every connected device, route, or operating mode. Signal detection alone also doesn’t prove that the displayed image is free of artifacts, that protected content will play, or that the complete chain will remain reliable during normal use.
Intermittent faults need repeatable checks. Retest under matching conditions, including the source output, display input, signal route, and requested format. Record the full chain and settings beside each result. If a problem occurs only at a particular resolution or after adding a switcher, those details help narrow the next diagnostic step without making an automatic replacement decision based on one pass or fail.
- Pass: The tested function met the tool’s criteria.
- Fail: The selected check did not meet those criteria.
- No signal: No signal was detected at the test point in that setup.
- Unsupported format: Verify whether the limitation belongs to the tester or another device.
Once test results clarify the system requirements, compare professional AV components with the actual signal path. Explore professional AV hardware for signal routing and display distribution.
From HDMI Diagnosis to a Reliable Pro AV Signal Path
A test result is a starting point for system planning, not a reason by itself to replace equipment. If a direct source-to-display connection works but the full route fails, map the path and identify where behavior changes before altering the design. A failed segment test can guide the next check, but it doesn’t prove a component is defective.
Use test findings to plan the signal chain
Document every source, cable run, switching point, extender, adapter, and display. Then match each component to the verified operating requirements, including resolution, refresh rate, and content-protection needs. Use the tester’s result to focus on the relevant route or function, then validate the complete path in its actual configuration.
Choose system components for their role in the signal path:
- Matrix switcher: Relevant when multiple sources need routing to multiple displays. Confirm the required input and output paths and operating formats.
- Extender: Relevant when a source and display are separated by a longer cable run. Evaluate the link as a complete source-to-display path, not just as separate cable pieces.
- Video wall processor: Relevant when video must be arranged or processed across a video wall. Check the full signal route and intended display configuration.
If a project distributes video over coax, the HDMI modulators professional guide offers context for that approach. The right choice depends on the installation’s requirements, not just the result from one test point.
Next steps for installers and integrators
Before changing the system configuration, preserve the test record: source and display, cable route, switching or extension devices, settings, tester mode, result, and displayed format. That baseline makes comparisons meaningful and helps show whether a change addressed the symptom or simply altered the conditions.
HDTV Supply supports installers and integrators worldwide with technical support for professional AV hardware. Its catalog includes matrix switchers, HDMI video wall processors, and TV distribution systems for a range of signal-routing needs. Use the documented system requirements and test findings to narrow the component choices.
System checklist:
- Map every source, connection, intermediary, and display.
- Record tested settings and observed results.
- Match components to verified format and content-protection requirements.
- Retest the complete signal path after configuration changes.
Explore professional AV solutions at HDTV Supply for system components and technical resources for your signal path.
Turn Your Test Results Into a More Reliable Signal Path
The right HDMI signal tester helps answer a specific diagnostic question, but its results apply only to the test it performs. Match its documented capabilities to your required format, then isolate the signal chain methodically: establish a direct-connection baseline, add components one at a time, and record the conditions and results.
Use those findings to guide the next step, not to replace equipment by assumption. A clear map of sources, cable runs, switching points, extenders, and displays helps you select components that fit the verified requirements of the complete system.
For your next professional AV project, explore HDTV Supply’s catalog of more than 12,000 products and access technical support for installers and integrators worldwide. Explore professional AV solutions at HDTV Supply and move forward with a clearer plan for your signal path.
Frequently Asked Questions
What does an HDMI signal tester actually test?
An HDMI signal tester may check cable wiring, signal presence, supported formats, or selected connection behaviors. Its capabilities depend on the specific tool, so read the documentation to understand what each result means. A basic continuity pass confirms only the wiring check performed. It doesn’t prove that the source, cable, switcher or extender, display, resolution, and content-protection mode will all work together across the complete system.
Can an HDMI tester tell me why my TV says no signal?
An HDMI tester can help narrow down a no-signal fault, but its results may not identify the cause on their own. Start by connecting the source directly to the display with a known-good cable. If that works, add each switcher or extender one at a time and repeat the test. Record when the failure returns. This points to a section of the signal path for further diagnosis without assuming a particular component is at fault.
What is the difference between an HDMI cable tester and an HDMI analyzer?
A basic HDMI cable tester generally checks cable wiring or continuity. An HDMI analyzer may provide information about an active signal or its format, depending on its documented test functions. Neither tool automatically checks every device, route, or operating condition. Choose based on the layer you need to investigate, then review the specific model’s supported formats and functions before interpreting a pass or fail as evidence about the wider system.
Can an HDMI signal tester verify 4K or 8K video?
Some testers document support for specific video formats, while others don’t test them. Compare the tester’s stated resolution, refresh-rate, and bandwidth limits with the requirements of the source and display. A result for one format doesn’t confirm another. Also distinguish detecting a signal from checking how the complete installation performs. The tool’s documentation defines what its result establishes. Test the full signal path under the conditions you intend to use.
Can an HDMI tester diagnose HDCP or EDID problems?
Only a tester with relevant, documented diagnostic functions can test HDCP or EDID behavior. EDID communicates display capability information to connected devices, while HDCP relates to protected content. A basic cable tester can’t establish whether either behavior is working. Check the tester and matrix documentation, then test the connected devices and signal path systematically. Interpret results in the context of the specific route and configuration, rather than treating them as a universal compatibility verdict.
How do I test an HDMI cable when there is no picture?
First connect the source directly to the display with a known-good cable. Confirm the selected display input and the source’s output settings. If a picture appears, reconnect the original cable run and add each intermediary one at a time, repeating the same test. A cable tester can check wiring; an analyzer may provide signal details if its functions support the test. Record the complete setup and each result to identify where behavior changes.
Leave a Reply
Want to join the discussion?Feel free to contribute!